My Favorite Shirt

A couple of years ago I was wandering through Nordstrom looking for a dress shirt or two when I came across a rack of mock turtlenecks. I took a black one off the hanger, held it up to my chest and was immediately sold.

It’s made of 100% pima cotton that’s thick but not too thick. It stretches a bit but not too much. It goes well with jeans or Dockers. It’s the perfect shirt.

shirt

And of course, it’s black. One can never have too many friends or too much black in the closet.

So I bought a black mock that day and wore it everywhere. It become my favorite shirt. That was two years ago.

A few months ago I noticed the shirt had seen better days. The stitching along the neckline was beginning to fray. I could see small pieces of banding coming through. But that didn’t stop me from wearing it. It endeared itself to me more so.

But I began to look around for a replacement. I went to Nordstrom, but could not find the same style or brand. I had no luck searching online either. I was about to give up and try shirts from J. Crew or Lands End.

Then today I was walking through Nordstrom’s flagship store in downtown Seattle and noticed a rack of full of my favorite shirt! Of course, I bought a black one. And navy.

Thirty bucks a shirt. What a steal.

I’m back in business.

My Top 5 Twitter Tools

I can’t believe I’ve been using Twitter for two years. Over that time I’ve tried a number programs and services that promise to enhance, make it easier to use or just make Twitter more fun. I used to manage everything from the Twitter website, but that’s become time consuming as the number of people I follow has increased. 

Just for reference, I’m currently following about 1800 people. You can add me from my profile page if you’re interested.

I wrote a similar post about a year ago, but a lot has changed in 12 months. I’ve settled on a few services that I regularly use. Here’s a list of my favorites.

Favorite ClientTweetDeck

If I could only use one of these tool or services, TweetDeck would be it. This is a must have application for those who follow more than a few hundred people. My favorite feature is how TweetDeck allows me to organize those follow by creating groups. It might be too much for those new to Twitter, but it’s changed the way and frequency I connect with others more than anything else here. For example, I’ve created a group called Friends. When any of these people tweet it shows up in its own window making. You can even create groups based on keyword searches.

The only downside for some is that TweetDeck takes a lot of screen real estate. It’s made for those running dual monitors. Try Twhirl if you are short on screens. But the best compliment I can give TweetDeck is that it makes Twitter more fun.

Here’s how my configured TweetDeck looks. I’ve created groups for All Tweets, Replies, Friends, Sent, and Direct Messages.

tweetdeck

Favorite Follower ManagerTwitter Karma

This service has grown on me over the months to the point where I use at least one a week. Twitter Karma, like TweetDeck, is probably more useful to those who follow or are followed by more than a few hundred people.

Basically, Twitter Karma makes it easy to see the following:

  1. People I follow who follow me
  2. People who follow me but I don’t follow them
  3. People I follow who don’t follow me

I care most about #2 above because it lets me catch someone worth following that I missed merely looking at my list of followers at Twitter home.  It also allows you to bulk follow or unfollow. Some people use this service to prune people they follow who haven’t reciprocated, and it makes quick work of that. But I’ve enjoyed Twitter more the less I worry about who or how many are following me. I try to focus on following interesting people who make me laugh and whom I can learn from.

twitterkarma

Favorite Stats ServiceTweetStats

This falls into the fun category of Twitter tools. TweetStats was created by Damon Cortesi and is a lot of fun to use. Wonder when you send the most tweets or whom you tweet most often? This will tell you.

tweetstats

Favorite General ServiceTwitter Grader

This polished tool takes a number of helpful services and combines them into one. At first you might be most interested in what your “grade” is, but dig a little deeper and you’ll find a number of neat features that enhance Twitter.

 grader1        grader2

My favorite feature is how it looks at my profile suggest people in my vicinity to follow. For example, I’m presented here with a number of people around Seattle that might be interesting to follow which I can do right from the page if you’re logged into the service. Twitter Local provides a similar, if not more detailed service but I don’t use it as frequently as Twitter Grader.

Favorite URL Shortener/Link SharerTweetburner

This is an interesting service, and it may not be apparent why you’d want to use a service like this at first glance. This service is for people who want to shorten a URL to send over Twitter and find out how many people clicked on the link. It’s sort of like a TinyURL with stats if that makes sense. It’s simple to use, and I enjoy seeing which links get the most traffic.

tweetburner

There are many other fun Twitter services out there for the using, but these are the five I’ve come to rely on and use regularly. I would have added Summize to the list,  but they were recently purchased by Twitter and have become the standard Twitter search.

What Twitter tools and services have you come to rely on?

Update: One of my readers pointed out that I didn’t include a single mobile application and he’s right. I own a crappy Windows Mobile phone for now so I don’t access Twitter much with it. When I do, I use m.twitter.com. If I eventually get an iPhone I’m sure that will change, but I do 99% of my twittering from a laptop or desktop computer running Windows Vista.

Cool Firefox Add-on

This is one of my favorite Firefox add-ons I’ve come across in a while, and I use it several times each day. I come across words I don’t know all the time and I use this add-on called Dictionary to find the meaning. All I have to do is highlight the word, right click and Dictionary launches a tab with the meaning.

You can choose from the Oxford, Cambridge or the Dictionary.com definition. I prefer the results from Oxford because they are short and to the point.

Tonight I looked up the word, xenophobe, when I came across the word on a blog. I don’t believe I’ve used that word in a sentence before. It may be a word that’s difficult to work into a conversation, but I’m going to try it out tomorrow now that I know exactly what it means.

 dictionary

Getting Started With WordPress

A number of friends and coworkers along with a few people who read my blog have asked for help in starting a blog. Most questions centered around what blogging platform and hosting company to use. I used to tell most of these people to take a look at Blogger and Windows Live Spaces. If they were geeks, I’d tell them to roll their own blog and install WordPress on their own domain. But I was hesitant to suggest that to everyone because I knew I’d be called on to provide tech support when they got stuck.

But over the past couple years or so it’s become easier for the less technically inclined to use WordPress. I’ll get into the reasons for this later, but if you’re reasonably comfortable using an FTP program you’ll have no problems getting up and running with WordPress. The installation and administration of is handled by a slick, easy to use web-based interface. Really, there’s nothing to be afraid of.

WordPress is a fantastic blogging platform for many reasons but a few of my favorites include it’s stability, ease of use and plugin and theme architecture. With plugins and themes, it’s easy to change the look of your blog and give it additional functionality without having to know how to program.

So here are the steps to getting up and running with WordPress. This assumes you want to run WordPress on an existing domain or register your own.

Select A Hosting Company

This is the most important decision you’ll make. A bad host will lead to lots of downtown and poor service and support while a good host will make the experience go smoothly. I’ve run WordPress on six different hosts and I can only recommend two of them: Pair and Bluehost. (Note: If you find this article helpful, you can help support me by signing up with Bluehost through the links found here. If you don’t that’s cool too) Both Pair and Bluehost are top notch hosting companies with excellent support and products. As with many services, you get what you pay for. You’ll find cheaper hosting companies but you won’t care that you saved two bucks a month when you’re blog is frequently down. I’m sure there are other good hosting companies, but I’m only going to recommend the two I’ve used for years and that I know you’ll be happy with. Having said that, Bluehost is the best hosting company I’ve used hands down. They are an excellent choice for the noob as well as the web savvy veteran. I’m currently hosting four WordPress blogs from one account and was able to setup each with a single click using a cool feature called Fantastico. I don’t know if Pair uses this but I assume it does or something similar.
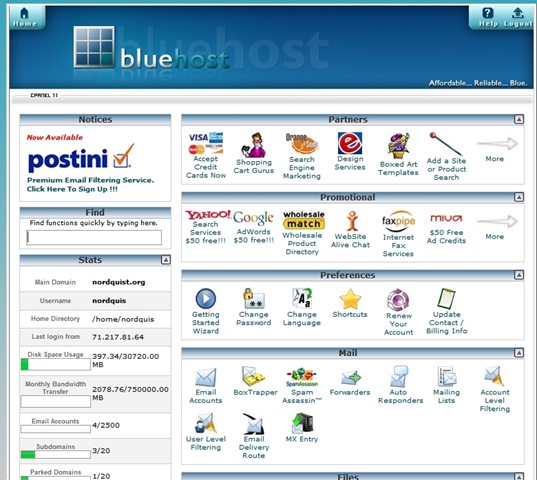
screen_2008-04-06 21.53.16

Login to CPanel

After you’ve selected a domain and signed up for a hosting service you should receive an email with the IP address of your website and instructions for logging into your CPanel (Control Panel) for the first time. (It may take a day or so for your domain to propagate out to the internet, but don’t be alarmed. You can still reach your site by IP address)

CPanel is the place you go to install WordPress along with keeping tabs on your site and a bunch of other stuff related to your account. I’m assuming you’re using Bluehost but most hosts have similar looking control panels. Follow the link in the email you received that will also include a username and password. At Bluehost the login is in the upper right corner and it asks for your domain and your password. Type both in and you should be taken to the Control Panel which looks like this:

screen_2008-04-06 22.02.58

Install WordPress

Scroll down this page until you come to Simple Scripts or Fantastico De Luxe listed under the Software/Service area. Either of these will install WordPress, but I’m more familiar with Fantastico so I’ll use that. Click on Fantastico over on the left navigation. To the right now you should see a link named New Installation.  Click on that and you should see a form that looks like this:

screen_2008-04-06 22.07.12

If you want to install WordPress into the root of your domain so your site is accessible at www.yourdomain.com then select your domain from the Install on domain drop down list. If you want to install WordPress on a subdomain such as I’ve done (blog.nordquist.org) you’ll need to go back the Control Panel page and setup a subdomain under the Domains areas. Most people want their blog accessible off the root domain.

Under the Admin Access Data area create a username and password and write it down. If you don’t have this, you won’t be able to login to your blog. Again, make sure you write this down!

Under the Base Configuration area do the same. I just use admin as the username and a password I can remember.

You don’t have to fill out the Email Account Configuration area at this time. But if you know this information it doesn’t hurt to fill it out now.

Once you have this form filled out, click on the Install WordPress button at the bottom of the page. Fantastico will tell you if WordPress was installed correctly. If it does then you’re ready to login for the first time.

Login to WordPress for the First Time

This is the moment of truth. You will fire up your browser and go to http://yourdomain/wp-login.php where you’ll see the graphic below. If you don’t see this graphic it means WordPress was not install properly.

image

Using the username and password you selected in the previous step, login to WordPress. If you’re using version 2.5, you’ll see a screen that looks something like this:

screen_2008-04-06 22.21.38

Before I post anything I like to check to make sure WordPress has all my current information. Do this by clicking on Settings off to the far right and check to make sure everything looks OK under the General Settings area. Give your blog a Title and Tagline if you’d like. When you’re done, click on Save Changes at the bottom.

Now look over to the far right and click on Users. This is where you’ll setup accounts for those who will be posting articles on your blog. Since I’m the only person who does that on my blog, I setup an account for Brett Nordquist. You’ll need to remember the username and password for this account as well. If you want to login as this new users you’ll need to logout first using the link in the upper right corner.

I suggest looking around the rest of the admin area. Once you’re ready to post you can do so by clicking the Write link in the admin or use a product like Windows Live Writer that acts like a word processor that posts to WordPress.

Themes and Plugins

Easily one of the coolest features of WordPress is the way you can easily change the look of your site by installing themes. There are thousands of available themes you can install for free.  You can also add additional features to your blog by installing plugins. An example of a plugin on my blog is one that pulls pictures from Flickr and displays them in the sidebar. Most plugins and themes are free to use.

Check out this post and this post for a few of my favorite theme collections. My only suggestion when it comes to themes is to keep it simple. The best themes I’ve used are the ones that don’t try to do too much. Try a single column theme instead of one with three or four columns if you’re just starting out as it will make editing the theme a lot easier.

screen_2008-04-06 23.13.47

I don’t spend a lot of time searching for plugins but I do run a few that add features to my blog that I find helpful. A few of my favorites are Flickr Badge, Google Sitemap, SRG Clean Archives, and Post Views.

FTP Recommendation

Once you’ve found a few themes or plugins you’d like to try, you’ll need a way of getting those files onto your server. There are a number of ways to do this but I’ve found that using an FTP client is the most reliable way to do this. Mosey on over to this page and grab the best FTP client around. It’s called FileZilla and it’s free to boot!

Once you’ve installed FileZilla, launch it and look for the host, username and password in the upper menu bar. In the HOST area you’ll type ftp.yourname.com along with the username and password you used to login to Control Panel. Then click on the Quickconnect button and you should see something like this if you’ve successfully logged in:

screen_2008-04-06 23.08.28

Look for the directory named wp-content and double click on it. Any new plugins you’ll need to upload into the plugins directory. Any new themes should be uploaded to the themes directory. Makes sure you read any instructions that came with the plugins and themes.

I suggest keeping your plugins to a minimum for a while but testing a number of themes until you find one that suits your fancy. Switching between themes it done in the admin area of your blog under the Design section. Once you see a preview of a new theme you’d like to try, just click on the picture and it’s done. Any plugins you upload will need to be activated by going to the Plugin area. Once activated your plugins are ready to go.

Well, those are the basic steps to get up and running with WordPress. If you have questions or suggestion feel free to use the comment section. What other suggestions would you have for those looking at using WordPress for the first time? I’m interested to hear what other reliable hosting companies you’ve found.

ThreatFire Protection

I came across a review for ThreatFire in the latest edition of Maximum PC which named it one of nine winners of their “Kick Ass” software awards. ThreatFire is an anti-virus program, but it instead of only being able to protect against known viruses and malware, it looks for malicious behavior making it effective against many “zero-day” exploits.  

screen_2008-04-05 11.26.59

I’ve installed ThreatFire on my three computers at home. It’s small footprint and easy installation routine make it simple enough for anyone to use. When ThreatFire notices potential malicious behavior it pops up a warning giving you the chance to shut the program down or allow it to continue. When I opened Outlook, ThreatFire noticed a plugin (Xobni) was attempting to access my .PST file and notified me.

I figured it would be a good idea to install ThreatFire on my kids computer which I did. But I think it’s just as valuable on Kim’s and my mine. Going forward, I will run ThreatFire and ETrust together.

Link to ThreatFire download

Technorati Tags: , , ,

Online Backup with Jungle Disk

I’ve had this recurring dream where I wake up to our house on fire. As I scramble out of bed, I yell to Kim, “You grab the kids and I’ll grab the external hard drive!!”

The point is that as our lives become more digitalized, the more important a backup solution becomes. We now have close to 23 GB of digital pictures on local drives at our home. The bulk of these were taken around the time each of our four children were born.

Tonight I asked Kim, “How much are those pictures worth to you?”

Up until now my backup solution has consisted of keeping a local copy on a hard drive separate from the operating system. Then each week I copy these same files over to a Maxtor Shared Storage that our three computers can easily access over the network. This is an adequate solution as long as at least one of the drives doesn’t fail (15% of external hard drives fail within 5 years) or are damaged or stolen.

I’ve been toying with the idea of adding a Windows Home Server to the mix on account of a friend’s recommendation. I manually handle some of the same tasks that WHS does automatically like imaging all three of my machines. Currently, I use Acronis True Image Home to take a weekly image. But I still run into the issue of having everything stored on a drive or machine at my home. And, although it would suck to have to reinstall Windows and all my applications, I’d be in far worse shape losing my pictures, documents and music.

So I’ve been researching online backup offerings over the past few weeks. I came close to going with Mozy which I still believe would be a good solution if all I wanted was backup and restore functionality. Mozy isn’t the best solution for those that want to share files or access them via web browser.

The Twitter crowd steered me into looking at backup solutions based on Amazon’s S3 Simple Storage Service. I wrote about this service a few weeks ago, but one feature that influenced my decision, was the “pay for what you use” pricing structure. I also like that Amazon is a big company that isn’t going to disappear one night with all my data. I trust they will be around for a long time.

I started by looking over the helpful list of Amazon S3 backup tools that Jeremy Zawodny put together. I asked my followers on Twitter what they use to narrow it down even more. After a number of recommendations from people I trust like Jamie Phelps and Marina Martin I decided to go with Jungle Disk. This is an interesting offering in that Jungle Disk charges $20 for their small and simple backup software that connects to the S3 service. Patience is required to get things setup properly, but I was off and running in ~30 minutes.

I’m currently backing up all my documents which consist mostly of Microsoft Office files. I’m also backing up my Outlook .PST file and all my digital photographs which takes up about 23 GB. Here is a picture of the current backup job:

screen_2008-02-17 17.07.45

The software is very easy to use if not very pretty. I don’t care how it looks as long as it works! As you can see, Jungle Disk estimates it will take another three days for the backup to complete. I am connected to the internet via Qwest DSL line with a 500-600 kb/s upload speed. I hardly notice it’s uploading files in the background even with three computers browsing the net simultaneously.

If you’re familiar with other backup programs you’ll find Jungle Disk very easy to use. On the configuration screen, I tell it which folders to backup. You can also select individual files. Here I’ve selected my Documents, PST file and photos directories:

screen_2008-02-17 17.08.18

One of the primary reasons I chose Jungle Disk was that it gave me access to all my files from a browser. It’s not fancy but it works. Here’s how it looks from within Firefox:

screen_2008-02-18 00.17.26

I hope I never have to do a full restore. But I feel I’ll be a lot better prepared now than I was last week when I was relying on a couple of consumer grade hard drives. That piece of mind is well worth the estimated $7 to $10/month the service will cost. I’ll post an update once I have everything backed up and restore a few directories. I don’t anticipate any problems given how smoothly things have worked so far, but time will tell.

I’m interested to hear what other backup solutions (on and offline) people are using.

Considering a Motorola Q?

I bought a Motorola Q a few months ago. It’s not a bad device if you text/email a lot, but it’s not a great phone. I wrote a review of this phone after I’d had it for three months.

I recently upgraded to the Motorola Q9M (I’m told the “M” stands for Music) which possess the same chip as the Q but includes several big upgrades. The biggest of which is the move to Windows Mobile 6. The Q includes Windows Mobile 5 which is quite sluggish in comparison. Windows Mobile includes some shortcuts when dealing with mail that are not included in WM 5. If you read a lot of mail on your phone, the small improvement can lead to big productivity gains.

It’s worth upgrading to the Q9M just to get Windows Mobile 6 but I’m not happy that Verizon and Motorola decided that the older model couldn’t be upgraded. Why would Verizon do this when the phones have the same chip? In order to collect more money from you, that’s why!

Here are a few more reasons the Q9M is better than the Q:

  1. Vastly improved keyboard – the Q’s keys are terrible. I made far more typing mistakes on the Q. The keys on the Q9M are still small but they have a much better feel and are spaced properly.
  2. Improved Battery – This is probably a benefit of Windows Mobile 6, but the battery life is much better on the Q9M than the Q.
  3. Lighter Weight – The Q9M weighs less, yet still feels substantial in my hand.
  4. Improved ergonomics – Not only does the keyboard feels a lot better, so do all the keys on the Q9M. The big arrow buttons and analog stick are much improved making menu navigation easier on the Q9M.

One question you might have is whether or not the Q9M is a better phone. I think it is for two reasons: keyboard makes it easier to dial and Windows Mobile 6 improves the phone functions. It’s still not a great phone and if you’re looking for a great phone, you’ll have to look elsewhere. But it’s serviceable. I can’t understate how much better the device performs under Windows Mobile 6 though which makes using the phone a much better experience.

I don’t know why Verizon continues to sell the Q except that it’s $50 cheaper than the Q9M ($199 vs. $149). The only thing I like better about the Q is the scroll wheel sticks out a bit further and seems to have a better tactile feel compared to the slicker wheel on the Q9M. But that lasted a day and now I can’t imagine going back to the Q.

If you’re considering one of these devices, go with the Q9M. Even if you’re not a heavy text/email users, you’ll appreciate the substantial performance upgrade that Windows Mobile 6 brings to the phone. I wish I had upgraded sooner.

image

image


              Q9M                                                 Q

My best purchase of the year

I can’t think any item I get more use out of than my Tumi Computer bag. I take it to work each day and to church every Sunday. It seldom takes a day off and I appreciate it the more I use it. If I could create the perfect everyday bag this would be it. Here’s what I love about it: 

  1. Made of “Ballistic” Nylon so it doesn’t tear or rip. It’s super durable. Any moisture just rolls right off it. screen_2007-12-01 01.17.06
  2. Perfect pocket placement for my glasses, keys, wallet, Smartphone, magazines, folders and laptop. It’s big enough to hold what I need but still feels small and lightweight.
  3. Quality materials. You won’t find plastic or cheap laptop dividers here. Every piece on this bag communications the quality of its craftsmanship.
  4. Leather covered handles and padded shoulder strap. The cheap bags just don’t feel right on your shoulder or in your hand. Tumi thought of all the small details that delight.
  5. Understated design. It doesn’t include obnoxious logos or colors that broadcast to everyone how much you paid for a bag. Remove the ID tag and few will know it’s a Tumi.
  6. Best Zippers Ever. The Zippers are one of the first parts to go on most bags. The zippers on this Tumi are the best I’ve ever seen. They are large, heavy and screen_2007-12-01 01.16.19molded just right so you don’t catch the fabric.

Two more small details speak volumes to how much thought went into this bag. First, if you look close, you can see how the handles loop through the fabric of the bag for better durability. But Tumi took it a step further and formed a firm leather ring about the holes that looks looks so elegant you have to see it in person.

The second tiny detail that stands out is how Tumi put a small, unnoticeable air vent near the very bottom of each front pocket. This gives each pocket the chance to breath and stay cool in case you decide to carry along a candy bar or something else that might normal melt in a small, warm space.

This Tumi bag is the best purchase I’ve made this year. Before I bought this bag I carried a similar style bag from Andiamo that was a tad larger and heavier. I bought it at the same time I bought a piece of their luggage which I still use when I travel today. The Andiamo bag lasted me 10 years and cost $350. But I consider the Tumi an even better bag and a relative bargain at $250. That’s still a lot of money to pay for a bag but considering how much use I get out of it, the cost  breaks down to $25/year if it lasts as long as my previous bag. Highly recommended.

Technorati Tags: , ,

My favorite low carb wraps

I’ve tried a number of low carb tortillas and wraps. Most are pretty good, but a couple have had a weird texture and not much flavor. This week while at Fred Meyer, I noticed a display full of wraps from Flatout. For those who are watching carbs, they are a great alternative to bread. One wrap has only 90 calories, 6 net carbs and 9g of fiber and no sugar. They comes in packs of six for about $2 at Fred Meyer. 

Today I pulled out a wrap and put some cheese and pepperoni on it. After about a minute in the microwave, I rolled it up and was surprised at how much better it tasted than many of the low carb tortillas. The wraps are smaller than most of the tortillas but they are thicker and seem more filling.

I plan to roll up some turkey or roast beef sandwiches for work next week. Highly recommended even if you’re not watching carbs.

flatouts

Technorati Tags: , ,